what to do with site after switching hosts
Trying to figure out how to move a website to a new host without breaking anything, causing downtime or any other issues that could hurt your Google rankings?
As with whatever move, moving your site to a new host can feel a footling daunting, particularly if you haven't done it before. Nonetheless, it doesn't have to be, and with the tutorial that we'll share in this mail, you lot should exist able to movement nearly any website to a new host.
A quick notation here – in this mail, we're focused on a generic process for how to motility a website to a new host that will work for all websites, including WordPress, Joomla, Drupal, etc.
Even so, if you are using WordPress, there are some tools that make the process a lot easier, and we have an entire guide defended just to WordPress and those tools.
👉 Go to our WordPress-specific guide for moving web hosts
Merely first – does your new web host offer free migrations?
Before yous start down the manual road of how to move a website to a new host, we'd encourage you to check whether your new host offers a free migration service (or an affordable paid service).
Many hosts will migrate at to the lowest degree one website for gratuitous when you lot sign up. If you're moving from ane cPanel host to another cPanel host, it's likewise usually pretty like shooting fish in a barrel for your host'due south support staff to migrate your entire cPanel account, which means yous'll be able to bring everything over in one step.
If you lot're notwithstanding undecided on which host to switch to, some quality and affordable hosts that offering free migration services include:
- A2 Hosting
- GreenGeeks
- InMotion Hosting
You'll likewise find other hosts that offer professional person migration services for an affordable price. Some good options here are:
- SiteGround – equally low as $30/site for professional migrations (or free WordPress migrations using SiteGround's automatic tool).
- Bluehost – $149.99 to professionally migrate up to five websites.
- DreamHost – $99 to migrate whatsoever type of website (or free WordPress migrations using DreamHost's automated tool).
If y'all tin can swing information technology, paying for someone else to exercise the piece of work for y'all can salvage you lot a lot of aggravation, especially if you're not a technical user.
And if you're using WordPress and however reading this article, most premium managed WordPress hosts also offer free WordPress migrations. Practiced options hither are:
- Kinsta
- WP Engine
- Flywheel
How to move a website to a new host – step-by-step
If you're fix on manually migrating your site to a new host, here's a bird's eye view of the steps that yous'll take in this tutorial:
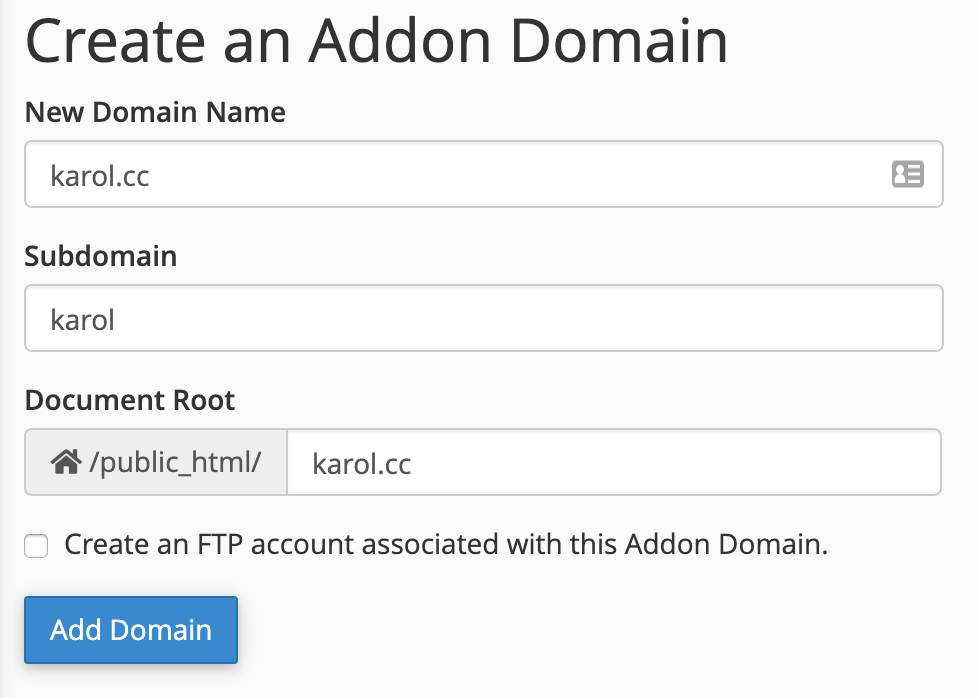
If you only take one site, you probably entered your domain name already when yous signed up for your host. Nevertheless, if y'all have multiple sites, you might need to create an Addon Domain instead *:
* Addon domains are what cPanel calls additional domain names – your host might use dissimilar terminology if information technology doesn't use cPanel.
2. Move your site's files using FTP
Next, y'all need to move all of your site'due south files to your new host. This might take some time if you have a large site, but you'll only need to put in a few seconds of manual effort – the remainder is just waiting.
The easiest way to movement your site's files is via FTP. To connect via FTP, y'all'll need an FTP programme – FileZilla is a good free option if you're not sure where to start, merely there are lots of good FTP clients.
💡 Confused by FTP? Check out this total guide to FTP to learn the basics
In addition to your FTP program, you'll also need the FTP credentials (host, username, countersign, port) from both your old host and your new host. You should exist able to find these in your hosting dashboard, but you tin ask your host'southward support staff for help if needed.
One time y'all have that information, open up two windows for your FTP program:
- Window 1 – connect to your existing host using your FTP credentials.
- Window 2 – connect to your new host using your FTP credentials.
In both windows, browse to your site'southward main folder:
- Window 1 – you lot should see all of your site'south files.
- Window 2 – this should be mostly empty, though you might see a few files from your host.
Select all of the files in Window one (old host) and download them to your local computer:
Some FTP programs volition permit you drag files directly between the two windows, but FileZilla doesn't currently support this feature. If you're using a different FTP programme, you can check to see if it volition allow y'all move files direct.
In one case the download finishes, upload all of those files using Window two (your new host). You tin but drag-and-drib all of the files from your reckoner into the FileZilla interface.
For a big site, information technology might have a good bit of time to both download and upload all of the files, so you might want to footstep away and do something else while you wait.
iii. Consign your site'south database from your existing host
In that location are 2 parts to well-nigh websites:
- Your site's files, which yous moved in the previous step.
- Your site's database, which usually contains all of your site'south content and settings.
If yous just have a static HTML website, you don't need to move your database because your site doesn't have a database.
Yet, most content management systems (CMS) rely on a database to store your content. This includes:
- WordPress, Joomla, Drupal, Magento, etc.
To move your database, you'll first need to consign your database from your existing host. Then, y'all'll import it to your new host in the next step.
To consign your database, you lot can use phpMyAdmin, which is a database admin tool that near hosts offer. If your current host uses cPanel, you lot should see a phpMyAdmin tool in the Databases section.
One time y'all open phpMyAdmin, you'll need to select the database for the site that you want to movement on the left (you lot'll encounter multiple databases if you host multiple sites).
Then:
- Become to the Consign tab
- Select Quick for the Export method
- Choose SQL for the format
- Click Go to export your database
4. Import your site's database to your new host
Once you've exported your site's database from your sometime host, you lot demand to contrary the process and import it to your new host.
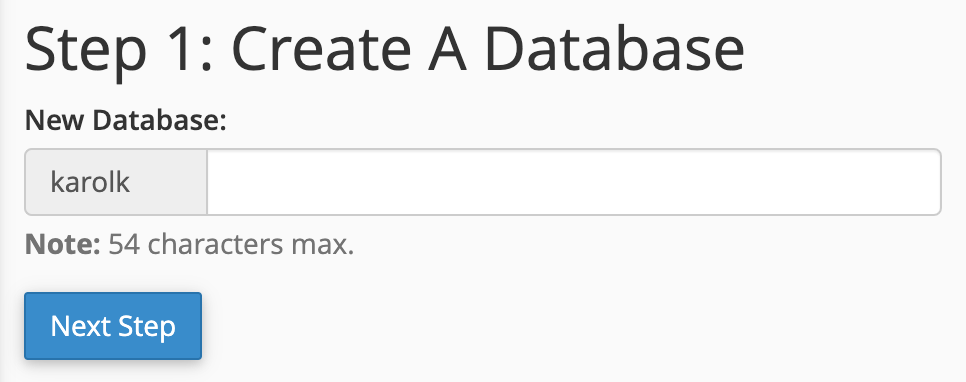
Before you can do that, you need to create a new, empty database at your new host. If your host uses cPanel, you lot can do that by opening the MySQL Database Sorcerer tool under the Databases department in cPanel.
While going through the wizard, you'll be prompted to enter a:
- Database name
- Database username
- Password for your database username
If possible, try to use the exact aforementioned database proper noun, username, and countersign every bit your onetime host. This will eliminate the need to update configuration settings. If you don't remember those details, that's ok – you lot'll but demand to update configuration files in the side by side footstep.
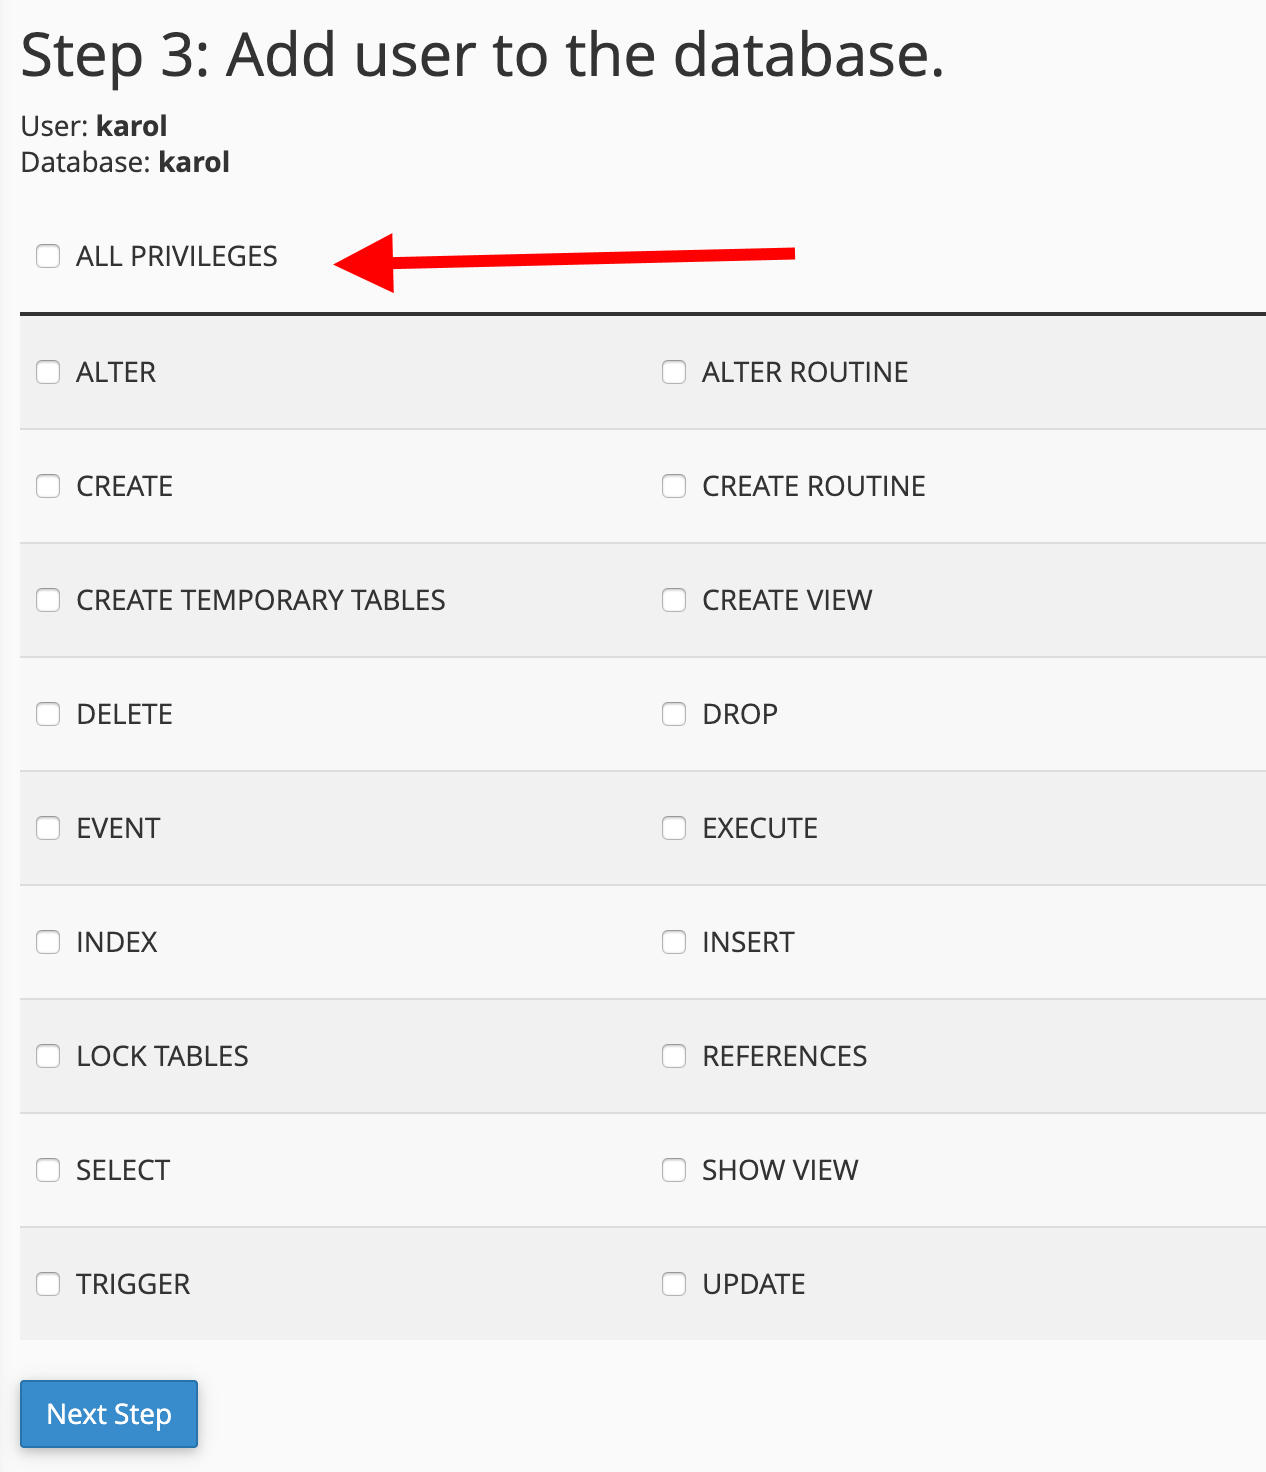
Once you create your database username, you lot'll demand to requite it all privileges on the next screen:
Afterward creating your new database, open phpMyAdmin at your new host and select the database that you just created using the sidebar on the left.
And then:
- Get to the Import tab
- Employ the File to import section to select the .sql.zip file that you exported in the previous footstep
- Click Go to import your database
Ideally, you'll be finished now. However, some CMS tools utilize database serialization which can cause bug when you export/import your database like this. WordPress is i example where information technology'due south common to meet database serialization bug.
Unfortunately, we tin't give ane blanket recommendation for all platforms hither because it depends on the platform (and you might not even experience whatsoever problems).
If you experience issues, you tin commonly use Google to find scripts that can help you fix the trouble for your specific platform. For example, here's a popular script that can fix WordPress database serialization issues.
5. Update any necessary configuration details (depends on CMS)
Once again, it'due south difficult to give specific instructions here because this step will depend on your CMS and how it'south configured.
However, at this point, you might need to update some configuration details in your site'south configuration files or settings to bespeak to the new database that you created (especially if you used a dissimilar database name, username, or password).
Here are tutorials for how to update this information for some of the almost pop CMS tools:
- WordPress
- Drupal
- Joomla
- Magento
If y'all're using a dissimilar website platform, y'all might need to plough to Google to figure out how your platform handles configuration files.
6. Exam your site
At this betoken, your site should be working on your new host. Nevertheless, y'all'll want to thoroughly test it to make certain it is.
You lot can't do this by entering your site'southward domain proper noun because your domain name yet points to your one-time host (for now). This is necessary to ensure that yous don't have any downtime during the movement.
There are two ways to go around this:
Selection one: Employ a temporary URL
Most web hosts give you an pick to view your website on a temporary URL before switching domain names.
This temporary URL typically looks something like this:
https://[cpanel_ip_address]/[cpanel_username]/[domain.com]
For example:
http://171.654.321.000/~colin12/codeinwp.com/
If you're non sure where to discover this temporary URL, nosotros'd recommend asking your new host's support for assistance.
Option 2: Edit your computer's hosts file
Some other option to exam your site is to edit your estimator's hosts file to bespeak to your new server. This lets you manually override your computer to tell it to use your new server when you lot enter yoursite.com (all of your other visitors will nonetheless be taken to your existing host for now, though).
Offset, you lot'll demand your server'due south IP address, which y'all can find in cPanel (or, your host usually includes this in your welcome e-mail):
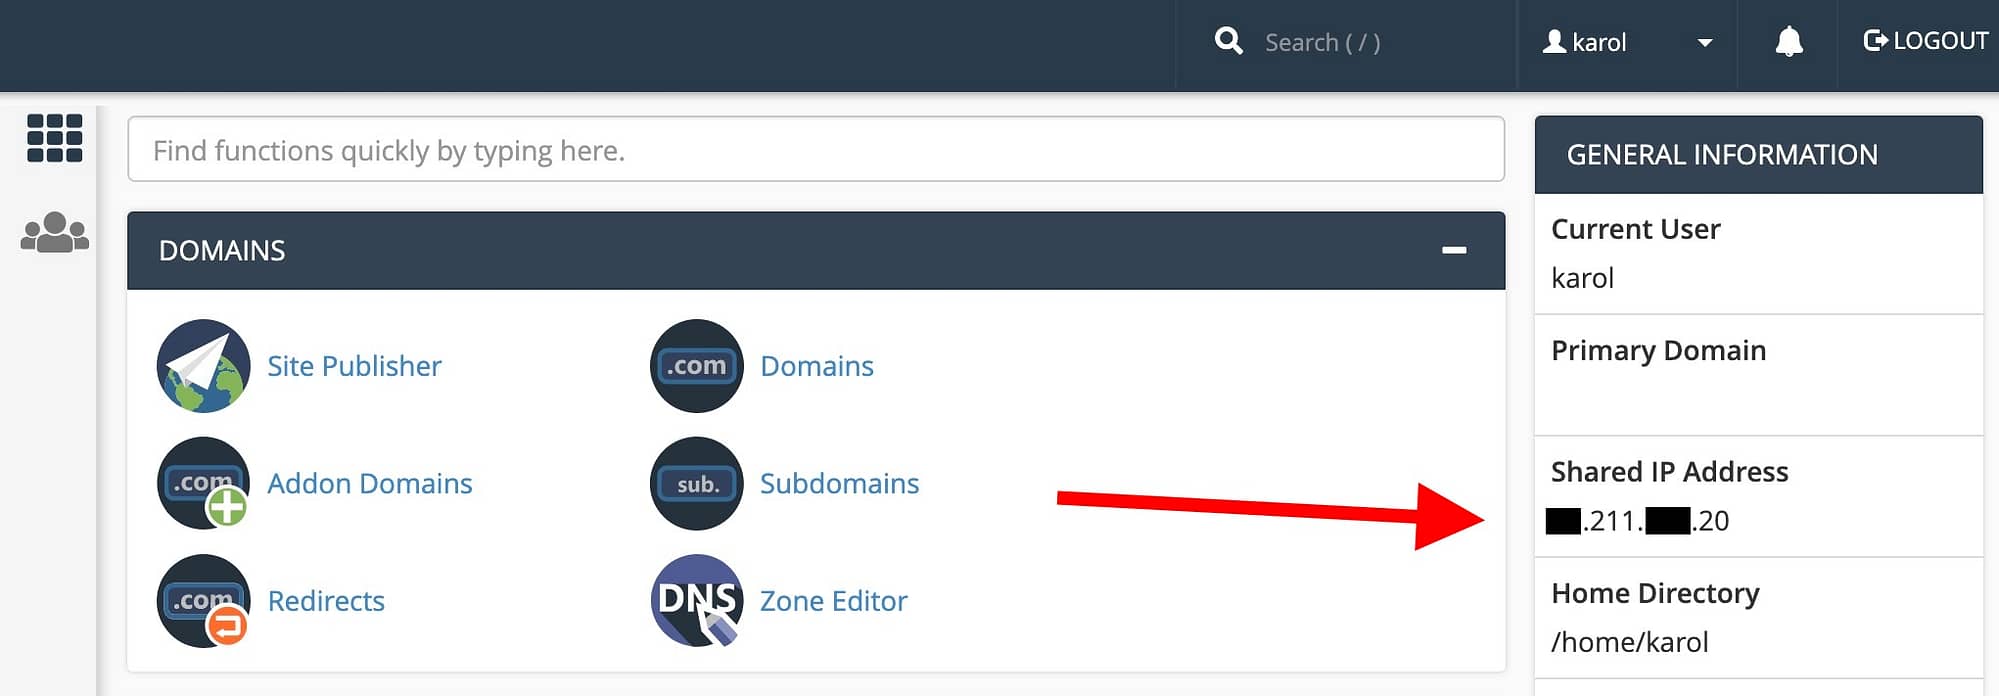
Then, yous'll need to edit your hosts file:
How to edit the hosts file on Windows How to edit the hosts file on Mac
You tin find the hosts file in C:\Windows\System32\drivers\etc. It may be subconscious, so yous might want to arrange the file display settings to encounter information technology.
The hosts file has no extension but it'southward in plain text format, which means that y'all can open it with Notepad or any other text editor (only right-click and tell Windows to open information technology with Notepad).
At the very terminate of this file add together a new line like this:
YOUR.SERVER.IP.Accost YOURDOMAIN.com
For instance:
x.21.11.192 YOURDOMAIN.com
Save the file.
To go started, open the Last app – you can discover it via App Launcher.
In Concluding, blazon in sudo nano /etc/hosts and hit enter.
Then, enter your admin password and hit enter.
You should now be in the Nano text editor with your hosts file open up.
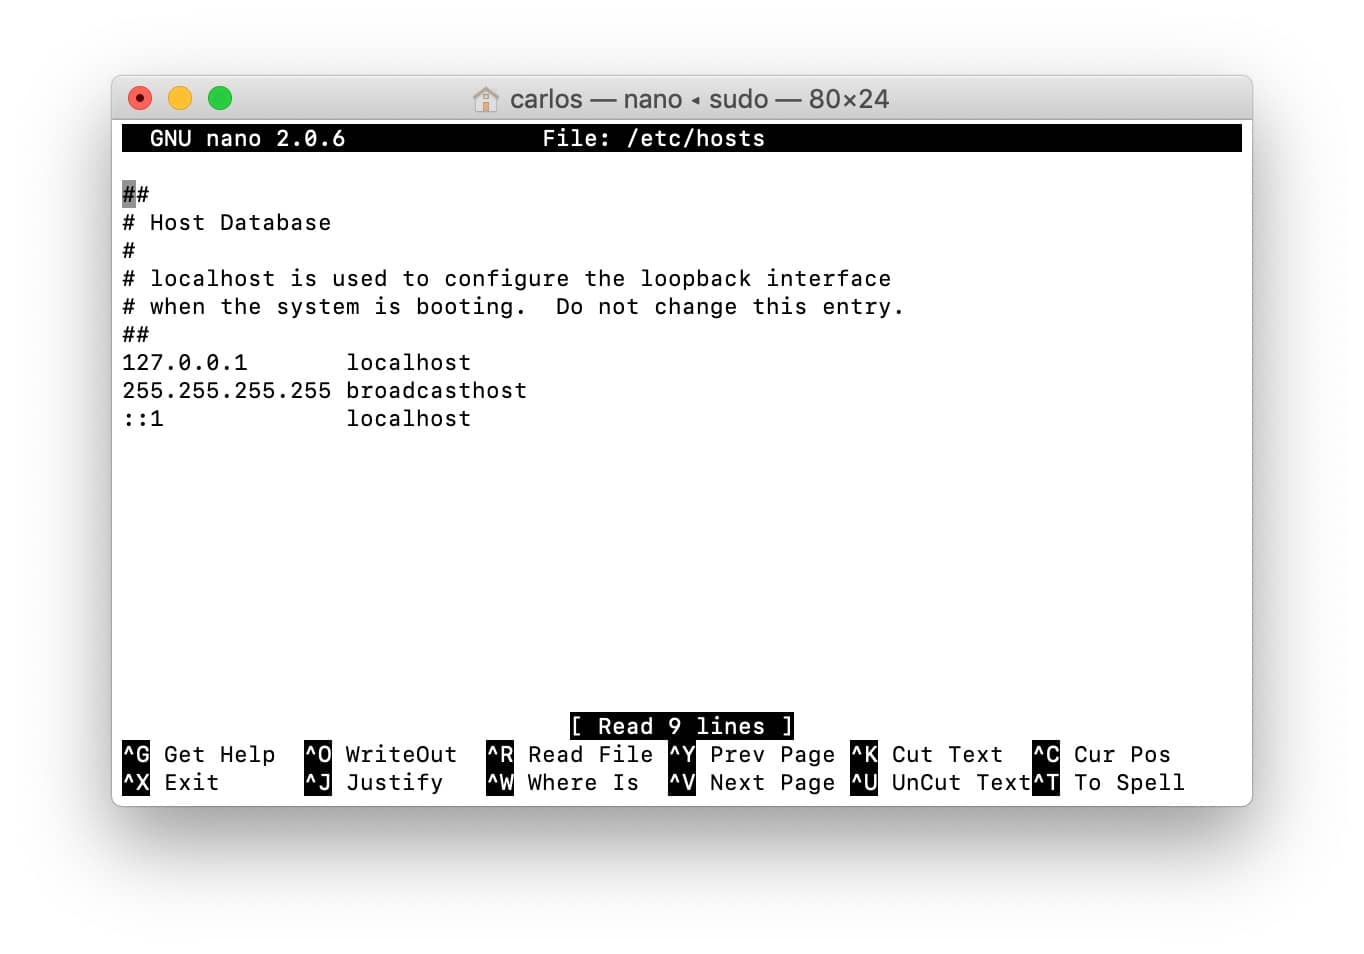
Position the cursor at the bottom using the pointer keys.
Add a new line at the very cease of the file:
YOUR.SERVER.IP.ADDRESS YOURDOMAIN.com
For example:
10.21.11.192 YOURDOMAIN.com
One time you've added the line, concord down the "Control" and "O" keys to salve the file. So, hold down "Control" and "10" to exit.
Afterwards editing your hosts file, you should at present see the new version of your site when you lot browse to your domain name.
One time you've verified that your new site works properly, you're almost finished – simply two more than steps.
7. Movement your email addresses (optional)
If you're using email hosting from your old host to create a custom email accost – east.m. [email protected] – you lot'll also want to prepare this email address at your new host earlier yous brand the switch.
Otherwise, y'all won't be able to receive emails once you update your domain proper name in the adjacent pace.
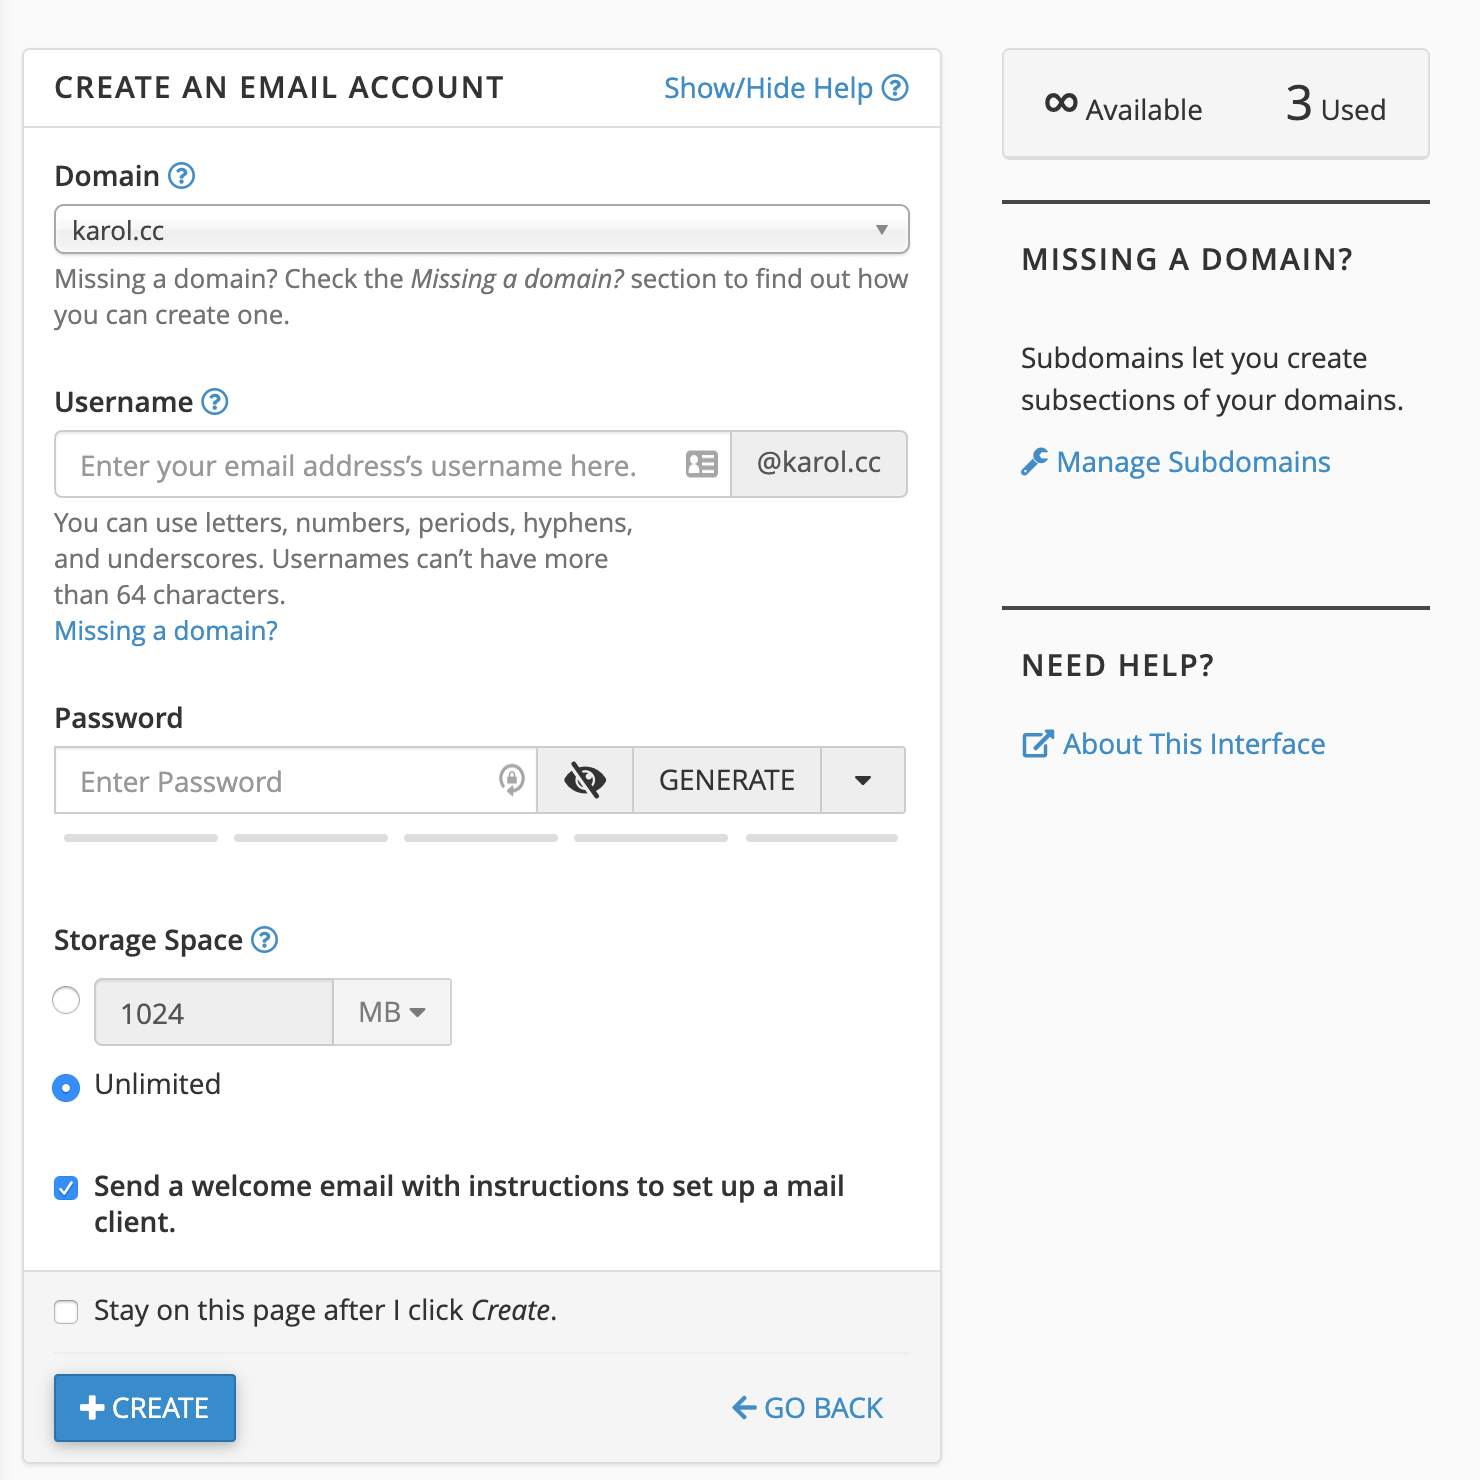
If yous're using electronic mail hosting from your host, you can exercise this past recreating your custom email addresses at your new host via cPanel:
If y'all're using a separate email hosting service (such as G Suite), you lot might need to change the MX records in the DNS settings at your new host in one case you bespeak your domain proper name to that new host in the next stride.
8. Update your domain name to signal to your new host
Once yous've verified that the migrated version of your website is working properly, the final step in how to movement a website to a new host is to update your domain name to betoken to that new host.
When y'all brand the update, visitors will exist taken to the new version of your site at your new host, with no downtime.
Typically, you'll do this by changing your domain's nameservers, which you lot can control from the service where yous purchased your domain name.
First, you'll need to locate the nameservers for your new web host. Yous can commonly find these in your hosting dashboard or welcome electronic mail. Or, y'all tin can enquire your new host's back up staff for help.
Your nameservers will wait something like this (but unique for each host):
-
ns1.yourhost.com -
ns2.yourhost.com
Most hosts provide two nameservers, merely some volition requite you three or four unlike nameservers.
Once you have your nameservers, here are some tutorials for editing nameservers at popular domain registrars:
- GoDaddy
- Namecheap
- OVH
- Bluehost
For example, hither'due south what it looks like to edit a domain'southward nameservers with Namecheap:

9. Test everything again
Now, you'll demand to wait for a little for the modify that you made to your nameservers to take result. This tin can take up to 24 hours, merely normally it'll only have xxx-60 minutes.
Once the change takes effect, you should exist able to access the version of your site at your new host when yous get to your domain proper noun.
Take some other moment to brand sure that everything is working:
- Browse around to different pages
- Test your forms
- Make certain you can receive emails (if using custom e-mail addresses)
- Etc.
If everything is nevertheless working, you're officially finished – that'due south how to move a website to a new host without any downtime!
Have questions virtually how to move a website to a new host? Ask away in the comments and we'll try to help!

Layout and presentation by Karol K.
* This post contains affiliate links, which ways that if you lot click on one of the product links and so buy the product, nosotros'll receive a commission. No worries though, you'll still pay the standard amount so at that place's no toll on your office.
Source: https://www.codeinwp.com/blog/move-website-to-new-host/
Post a Comment for "what to do with site after switching hosts"